
Hostwinds Tutorials
Search results for:
Table of Contents
Creating A Post In WordPress
Tags: WordPress
One of the most popular uses for WordPress is a blog. Even if it is not a blog site you have, you may still want to make posts. Posts are one of the fundamental ways to get content to the visitors of your site. This can be for News updates regarding your site or its products or simply a blog post to share your thoughts. Either way, in this article, you will find out how to deliver content to your visitors through Posts.
How To Create A Post Within WordPress
First, you will want to start by logging into the Dashboard for your WordPress installation.
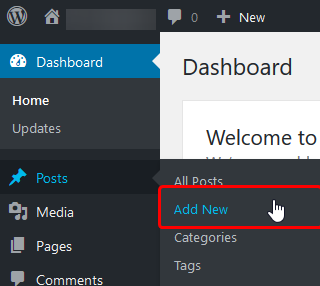
Once logged in, you will see various options on the left sidebar of the dashboard. One of them will be Posts you will want to either hover over this or click.
Then click on Add New from the available options.
After clicking the Add New from the options, you will be brought to a new page to type up your post. The text box at the top will allow you to set a title for your new post. While the bottom, the larger textbox will let you set the content you will put up. There are various options on this page for getting your post created.
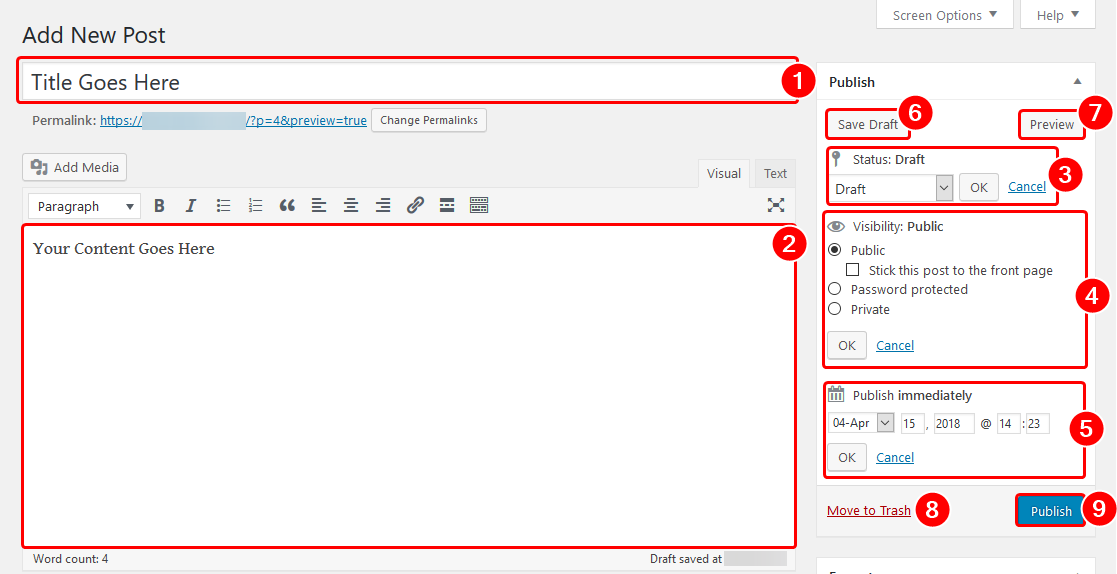
- Title: Here, you will put the title for your article—a short catchphrase or something to attract a visitor to click on the post.
- Body: This is where you will put your content. There are various plugins available as well that add more editing options. But for most, the default post editor is sufficient.
- Status: If you are saving the post as a draft, you also have the option to change the status to something else. Another possible option is for it to be Pending Review. This can be useful if more than one user is posting on the site, with a single editor or administrator.
- Visibility: Here, you can set the visibility of your article and how you want it displayed to your visitors.
- Schedule another time to Publish: If you are writing a time-specific article that you want to be published at a certain time, that is where this can come in handy. For example, if you are writing a holiday-themed article, but the Holiday isn't for another week, you can set this to release on the same day or just before the Holiday.
- Save Draft: This is a quick button to save a draft of your edits. This will save your changes but will not overwrite the existing changes that you currently have on your site.
- Preview: You can click on this to open up a preview of your latest draft and how it shows on the site. This would not overwrite the current article on your site, so you can view it before publishing any changes.
- Move to Trash: If you are Unhappy with your post or want to remove it from your site, you can click this button to move the article to the Trash.
- Publish: Click this button when you are ready to publish the post for the world to see.
You can do various things with your post, such as adding categories, tags or setting the featured image. These can help your visitors find your post better through searching and while navigating your site.

If you should have any questions or would like assistance, please contact us through Live Chat or by submitting a ticket with our Technical Support team.
Written by Hostwinds Team / April 18, 2018