
Hostwinds Tutorials
Search results for:
Table of Contents
How to Install a LAMP Stack on a VPS Cloud Server
Tags: Cloud Servers, VPS
LAMP is an acronym that stands for Linux (L), Apache (A), MySQL (M), and PHP (P). A LAMP stack contributes to many different web applications, providing the core fundamentals required for appropriate hosting. The LAMP stack construction supports established applications such as WordPress, Drupal, and much more.
To use a LAMP Stack, all that is needed is the base Linux Package. You can install a LAMP stack on the Linux VPS after you've connected as a root user through SSH.
LAMP Stack Preparation
Prerequisite: Before beginning further installation, you need to ensure your OS is up-to-date by running the following command:
yum update
Install Apache
Step 1: Install Apache as the webserver. Enter "Y" for yes when prompted.
yum install httpd
Step 2: Enable Apache.
systemctl enable httpd
Step 3: Set Apache to start upon booting.
systemctl start httpd
Step 4: Check the status of Apache (httpd).
systemctl status httpd
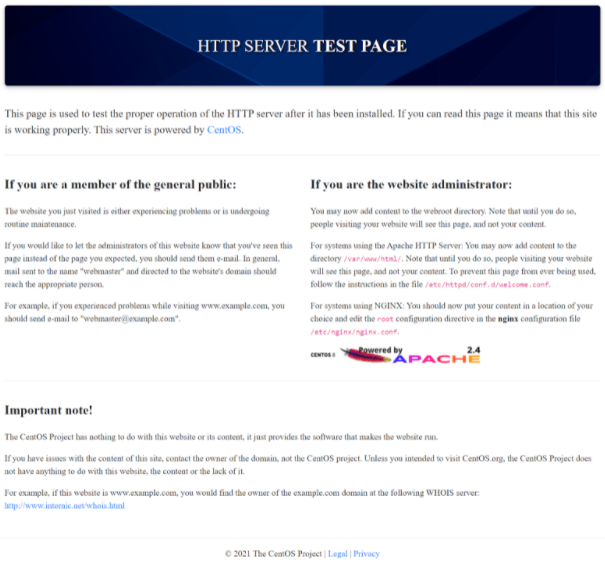
Step 5: Once Apache is installed and verified, ensure that it is working correctly by navigating to your server's IP in the URL. An HTTP Server Test Page should now appear.
Install MySQL
Step 1: Now, you will need to install MySQL. Follow the quick steps below:
yum -y install @mysql
Step 2: Enable MySQL.
systemctl enable --now mysqld
Step 3: Set mySQL to boot upon server start-up.
systemctl start mysqld
Step 4: Verify MySQL is active.
systemctl status mysqld
Step 5: Secure your MySQL.
mysql_secure_installationMySQL will ask if you want to validate the password component to test the password and improve security. Go ahead and input "Y" for yes.
Choose your password strength between 0 and 2. Next, you will need to enter a password that you will require in the future. Once you have done so and set your password, proceed with replying YES to the following options:
- Do you wish to continue with the password provided?
- Remove anonymous users?
- Disallow root login remotely?
- Remove the test database and access to it?
- Reload privilege tables now?
Step 6: From here, you will need to log in to your installed MySQL.
mysql -u root -p
Step 7: You will now need to create a database along with a user with privileges. For the sake of this tutorial we use "lampuser" and "password" as the database username and password. You can interchange these with your requirements.
CREATE DATABASE lamp_db;
CREATE USER lampuser@localhost IDENTIFIED BY 'password';
GRANT ALL PRIVILEGES ON * . * TO 'lampuser'@'localhost';
FLUSH PRIVILEGES;
Note: Running the above MySQL commands, "lamp_db" will be the database, "lampuser" will be the database username, and "password" will be the password for the database
Install PHP
Step 1: You will need to yum install PHP using the line below and answer "Y" for yes when prompted to do so.
yum install php
Step 2: Install further php extensions and applications. Answer "Y" for yes when prompted.
yum install php-pear php-mysqlnd php-curl php-mbstring php-gd php-xml php-pear php-fpm php-pdo php-opcache php-json php-zip php-cli
Step 3: Enable PHP.
systemctl enable php-fpm
Step 4: Ensure PHP starts upon booting.
systemctl start php-fpm
Ensure everything is running
Step 1: Ensure Apache is running by running the command below. Note that this process should also show an Active (running) status in green if it's working correctly.
systemctl status httpd
Step 2: Ensure MySQL is running by running the command below. Note that this process should also show an Active (running) status in green if it's working correctly.
systemctl status mysqld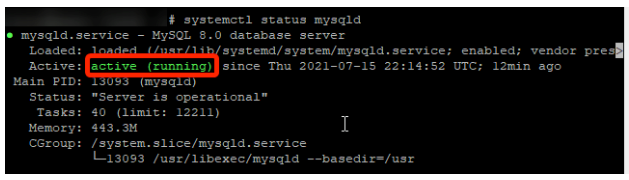
Step 3: Ensure PHP is running by running the command below. Note that this process should also show an Active (running) status in green if it's working correctly.
systemctl status php-fpm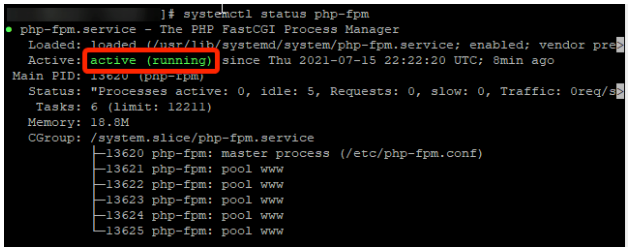
Step 4: You are now all done! Your LAMP stack has been installed and is ready to be used for any of your future hosting needs.
Related Tutorials:
Written by Hostwinds Team / July 31, 2021